
In the world of home décor, a unique piece of painted furniture can be the statement piece that brings a room together. More so when you wield the brush yourself, breathing life into a drab chair or a dull table. Let’s embark on this creative journey of transforming furniture using paint.
Contents
Understanding Furniture Paint
What exactly is furniture paint, you ask? Picture it as a superhero in the paint universe — a paint with a particular set of skills crafted especially for your beloved furniture. It’s a type of paint engineered to stick to surfaces typically found on furniture like wood, metal, and laminate.
Whether you want to revamp an old wooden dresser or add some pizzazz to a metallic patio set, furniture paint covers you. It’s lauded for its exceptional ability to provide stellar coverage, ensuring your piece is uniformly painted.
And that’s not all! It’s celebrated for its sturdiness, guaranteeing your furniture remains vibrant and chip-free for a long time. Plus, its user-friendly nature makes it an absolute favorite amongst DIY enthusiasts.
As if that wasn’t enough, some variants of furniture paint come with a secret weapon — a built-in sealer. This means you can skip applying a separate sealant, saving time and effort.
This quality alone makes furniture paint a valuable asset in your DIY toolkit when breathing new life into your living space. So, whether you’re a seasoned DIYer or embarking on your journey, remember, furniture paint is your trusted companion, ready to make your creative vision come to life.
Making Your Furniture Paint
Imagine the thrill of creating your furniture paint. Not only does it provide control over the hue and texture, but it also adds a special touch of personalization to your furniture project. Concocting your paint is surprisingly simple and requires just three household items: latex paint, baking soda, and water.
Start by combining three parts of your chosen latex paint with one part of baking soda. Then, add half part of the water to the mixture. Stir all the ingredients together until they blend into a smooth paste. You’ll notice that the baking soda imparts a chalk-like finish to the paint, making it ideal for furniture refurbishing.
Creating your paint from scratch affords you the freedom to choose the shade you desire and lets you tweak the consistency based on your needs. Want your paint thicker for an old-world, textured look? Add more baking soda. Are you looking for a smoother, more modern finish? Just increase the water quantity.

As exciting as it may be to get your hands dirty and start mixing, safety should never take a backseat. Always ensure the paint you use is non-toxic, and carry out the mixing process in a well-ventilated area. This way, you’ll protect your health and make the experience more enjoyable.
Venturing into DIY furniture paint production is more than just a cost-effective alternative to store-bought paints. It’s also a creative experiment that lets you learn, adapt, and create, making your furniture project a labor of love. And who knows?
You might discover a newfound passion for color mixing and paint creation! So, get ready to roll up your sleeves, grab your mixing utensils, and let your creativity soar. The world of custom-made furniture paint awaits you.
How to Use Furniture Paint

Before your creative expedition begins, proper furniture preparation is essential. This process involves thoroughly cleaning to eliminate dust or grime that could interfere with the paint’s adhesion.
Following the cleaning, a light sanding session will further enhance the paint’s ability to stick effectively to the surface. Should your piece require it, don’t hesitate to apply a layer of primer for optimal results.
With your furniture now primed for transformation, it’s time to unleash the furniture paint. Whether you use a top-quality brush or a foam roller, remember to apply the paint evenly to prevent unappealing streaks or blobs. Thin layers are your best bet here. This approach allows each layer to dry completely before the following one graces the surface of your furniture.
Once you have achieved the desired color intensity and coverage, it’s time for the final flourish – a protective top coat.
This last layer not only boosts the durability of your newly painted furniture piece but also enhances its aesthetic appeal. And there you have it – a few simple steps to using furniture paint like a pro. It’s time to grab that paintbrush, pull on your painter’s smock, and let your furniture painting adventure commence.
Mastering the Art of Painting Furniture
The beautiful dance between the paintbrush and furniture is an art that requires finesse, a keen eye, and a splash of patience. The first rule of this dance? Always follow the grain of the wood while painting. This simple tip will ensure your strokes blend seamlessly into the natural pattern of the furniture, rather than against it.
And now, for the fun part! Feel free to experiment with a myriad of painting techniques. Have you ever considered giving your piece an antique look? Try your hand at distressing — a method that involves strategically sanding off areas of paint to achieve a worn-out, vintage vibe.
If you’re aiming for subtlety, dry brushing might be your technique of choice, where a minimal amount of paint is applied for a softer, more textured look. If you’re feeling particularly bold, a faux marble effect could be the route, creating an illusion of luxury without the hefty price tag.
But remember, as in any art form, there are no failures — just opportunities to create something unique. Let your creativity take the reins, and don’t be afraid to go off the beaten path. Your imagination is your most powerful tool here.
You could try a color you’ve never considered or mix different styles. The beauty of furniture painting is that there are no boundaries, and each piece is an open canvas ready to be transformed by your artistic vision.
Also, remember that mastering an art form takes time. Practice is an essential companion to your journey. The more you paint, the more your technique will refine, your confidence will grow, and your unique style will shine through.
Painting furniture is more than just a process. It’s a journey of exploration and discovery that allows you to express your personality and leave your mark on your living space. So, let go of doubts, pick up that paintbrush, and let your inner artist shine. The world of furniture painting is waiting to be painted by you.
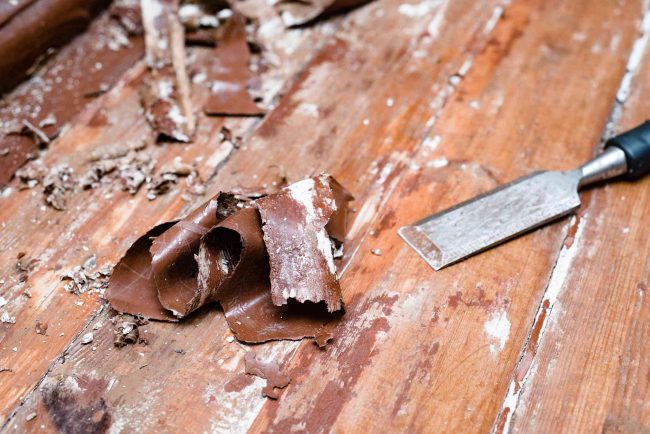
How to Remove Furniture Paint
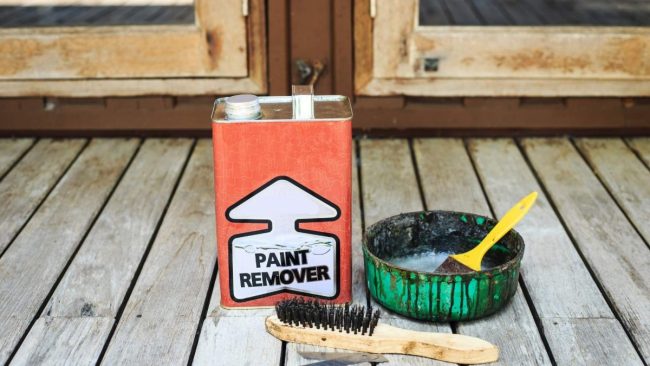
There may come a time in your furniture painting journey when you’ll need to strip off the old paint to make way for a fresh and vibrant new coat. Fear not, this process is easier than you might think and can be done using a trusty tool — a paint stripper. These can be found in your local home improvement store or online and are easy to use. Just be sure to follow the manufacturer’s instructions to a tee.
Once you’ve generously applied the paint stripper, give it time to work its magic. Like a good suspense novel, it’s all about patience! You’ll know it’s time to move to the next step when the paint bubbles and loosens.
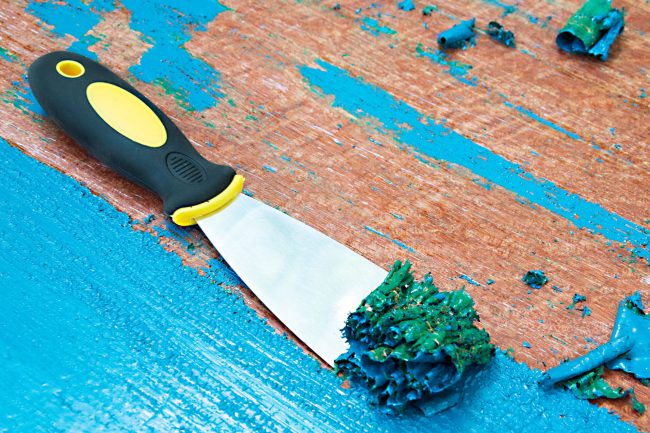
At this stage, arm yourself with a plastic scraper or steel wool and gently scrape off the softened paint. Remember, this isn’t a race, so take your time. The goal here is to be thorough and remove as much paint as possible without damaging the surface of your beloved piece.
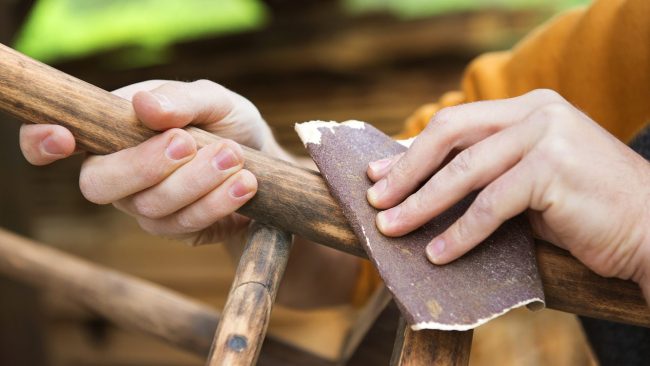
Next comes the sanding phase. You are using fine-grit sandpaper to smooth over the entire surface of your furniture. This step helps remove any residual paint and preps your piece for its new paint job by creating a clean, even surface.
Lastly, wipe down your furniture with a damp cloth to remove leftover paint dust. There you have it — a bare, clean piece of furniture, ready to be the canvas for your next creative endeavor.
So, roll up those sleeves and get ready to strip, scrape, sand, and shine your way to a rejuvenated piece of furniture. Remember, every great work of art begins with a blank canvas. It’s all part of the process, the art, the beauty of breathing new life into old furniture. Happy stripping!
Where to Find Furniture Paint and Accessories
Ready to embark on your furniture painting journey but need help figuring out where to start gathering supplies? You’re in luck! Finding quality furniture paint and essential painting tools is easier than you may think.
Home improvement stores in your local neighborhood and online are treasure troves filled with a vibrant array of furniture paint options. Brands such as Annie Sloan, Rust-Oleum, and Behr offer diverse colors and finishes to suit every creative whim and design aesthetic.
But the hunt doesn’t stop at paint. Brushes, rollers, and other painting tools are essential to transform your furniture vision into reality. Dedicated art stores are your best bet for procuring these essentials. However, if you prefer the comfort of shopping from home, numerous online platforms can cater to your needs.
In addition to procuring your tools and paints, engaging with a community that shares your passion for furniture painting is also beneficial. Online communities and forums offer a platform for idea exchange, troubleshooting, advice, and showing off your latest masterpiece. They are a goldmine of knowledge, providing tips and tricks to elevate your painting game.
So, fear not the search for supplies! With countless resources at your fingertips, you’re on your way to assembling the ultimate furniture painting toolkit. Dive in, explore your options, and let the world of furniture paint unfold before you. Your furniture painting adventure is just around the corner!


